

When I see popular topics on social media Precious Metal Clay forums being asked over and again, I’d like to provide a place for people to find those answers, so this week I’m continuing the topic of Metal Clay Connections with Post-fired Connections. My first article in this series was, “Strong Metal Clay Greenware Connections Have A Common Theme” discussing wet Metal Clay and greenware connections. Today, we will continue the discussion on connections and fixes that need to be made after you have fired your piece.
There are several reasons why you might want to, or need to, add to a piece created in Metal Clay after the initial kiln firing:
The artist whim and serendipity are high on the list.
To avoid distortion in complex construction.
To add a pre-fired element or manufactured elements to your piece.
To add to the design with embellishments needing a lower firing schedule.
Fired to Fired Metal Clay Connections
Sometimes you need to add an element after a piece has been fired. In this case, you can use Metal Clay lump or Metal Clay slip or Metal Clay paste type depending on the application and the size of the addition. Strength and durability are important, and so the right clay body and technique for the connection should be understood or the result could be quite unsatisfying. Let’s take a look at your options.


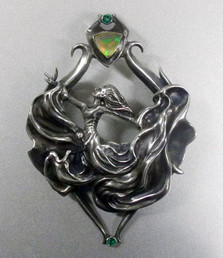
Works in progress: "Flow of a Dancer" (right). When the design element on the back (circled) didn’t fit my intention, a more fitting element was added in a post-fired connection. The old element became a nice pendant with Labradorite (left).
Fired Metal Clay to Fired Metal Clay – Big Additions and Complex Design
When the pieces are large and/or more complicated, or the addition gets lots of wear and tear such as a jewelry bail, I use lump Metal Clay with Pastemaker® for the attachment. The PasteMaker® is a thin liquid the consistency of water, and it allows the lump to stick nicely to the fired Metal Clay without effort, plus there is no pull away or separation along the joined area after firing the Metal Clay IF sanded appropriately beforehand. I can’t tell you what’s in that little brown bottle, and yes I did try to find out, but it gives the “stick to it” factor needed to help hold it all together, in combination with the viscosity of the clay.
Others have used Lavender Oil with their Metal Clay, along with other products out on the market, but this is my go-to since it works so easy and has never failed me.
What to do:
Start with 2 fully fired Metal Clay pieces at the highest firing schedule for maximum strength, and more importantly, maximum shrinkage to avoid distortion.
Rough up or sand the contact areas to be attached including the area just next to it allowing space to feather in excess clay for a seamless connection.
Mix a bit of PasteMaker® into your Precious Metal Clay to make a slip —you can also use Art Clay, PMC3, FS999, FYI, PMC Sterling, 950 Metal Clay or 960 Metal Clay or any number of the fine silver and sterling silver Metal Clays.
Coat the contact areas with the slip.
Next, add a drop or 2 of the PasteMaker® to your lump clay and knead it through the clay in plastic wrap — you only need enough clay for the repair. Then use the lump clay to make the connection.
After it dries go back and blend the transition points with the PasteMaker® on a brush or shaper tool for a seamless connection.
Refire on support material, such as vermiculite, in the kiln at the clay's highest temperature.

Learn about more about "Strong Metal Clay Greenware Connections Have A Common Theme"
Fired Metal Clay to Fired Metal Clay - Small Additions
With the addition of smaller and lighter items, flat-lying additions, or items that do not protrude significantly, I find Art Clay Paste Type® to do a nice job. It is made for fired to fired connections as well as greenware connections. Again, there are other solutions to the problem. I’ve heard of Kim's Clay Stay®, and lavender oil added to fine silver and slip bodies, so by all means, give them a try. However, the above works fine for me, and it is a good option if you don’t need the viscosity lump clay provides in holding two pieces together.
What to do:
First sand the contact areas.
Use the Paste as a glue to attach the pieces and feather to blend in the paste.
Allow to air dry before putting in a dehydrator or on a hot plate to fully dry, or the wet paste will bubble and dry funky.
Refire on support material as needed in the kiln at the same temperature on the bottle 1350°F or up to 1650°F (not listed on the bottle, but I do it all the time because fine silver can fire to that temperature). Remember, I'm a high fire gal.
Fresh Metal Clay to Fired Metal Clay
Recently, I was so excited to fire a piece I call, "Laughing Zebra." I forgot to put the mechanisms for my pin back, nor did I sign my name, in addition, the piece developed several surface cracks needing fixing. I’ve been working with Silver Metal Clay since 2012 and this had never happened. Never-the-less, I was able to add and repair with a fresh clay solution. I just love how forgiving Metal Clay is!


1) Sanding and adding PasteMaker® slip. 2) Adding fresh greenware Metal Clay pinback findings and adding Metal Clay to the surface to allow me to scribe my name and hallmark. 3) Surface hairline crack. 4) PasteMaker® Slip added to the crack and feathered in. 5) Polishing the surface smooth.
My "Laughing Zebra"
Fixing a Metal Clay Crack
There are two kinds of cracks, superficial surface cracks and deeper more critical cracks, each needing a different approach, but resulting in a nice fix.
What to do for a Superficial Surface Metal Clay Crack
Prepare the surface and adjacent areas to the crack by sanding.
Make the repair with slip, either Art Clay Paste Type® for Fine Silver Metal Clay or PasteMaker® Slip for any Sterling Silver Metal Clay variety to match the color of the metal.
Add the slip with a shaper tool, and squeegee the slip into the crack.
Feather the remaining slip onto the base.
Fire at the temperature for the slip.
After firing, brass brush, and use a rotary tool with 3M Bristle brushes for textured areas or flat rubber wheels for smooth areas. Use the most coarse grit “for the job” to remove and then smooth the excess metal. Overly coarse grits will remove the texture completely, too light of a grit and you will be there forever polishing. Polish until you don’t see the transition anymore, then work through to the finer grits until you get to the desired finish.
I always tell my students “If you have to ask yourself, ‘Can anyone can see this repair or seam, etc?’ the answer is usually YES, so keep on polishing because your gut feeling is speaking to you.”
What to do for a Deeper Crack
Prepare the surface and adjacent areas to the crack by sanding.
Make the repair with PasteMaker® lump Metal Clay as mentioned above.
Add with a shaper tool, and press the lump clay into the crack.
Feather the remaining clump onto the base with PasteMaker® instead of water and smooth the slip created.
Fire at the temperature of the Metal Clay used.
Finish as above.
Sometimes the crack is in a place where structural integrity is compromised or you can not see how deep the crack really is. In this case, I take a file open up the crack more so you can put a larger amount of Metal Clay in the area to ensure there will be no breakage down the line.
Mixed Temperature Firings: Adding embellishments needing a lower firing schedule than the base piece
I bought gorgeous faceted garnets for a piece I was creating, but the firing schedule said 1470°F. I like to fire to the highest schedule and strength possible even if it adds a bit more work, so I often use a 2-part firing to keep the main body of my piece strong especially if I have appendages that need the maximum strength.
In this instance, I will high fire the body of the piece in either Fine Silver Metal Clay, 950 Silver Metal Clay or 960 Silver Metal Clay. I then fire the gem in a handmade fine silver bezel at the lower temperature. I will join the gem to the base with the lower firing Fine Silver Metal Clay and fire at the lower 1470°F temperature. Since the addition is small and is not going to get wear and tear it is a safe bet for longevity.


Thurs., Jan. 2, 9, (skip 16 & 23) 30, Feb. 6, 13, 20 • 6 – 7 PM EST
(6) weeks
Bezel Setting Like a Pro - 2 choices
Mon., Jan. 6, 13, (skip 20) 27, Feb. 3 • 1 - 2 PM EST
(4) weeks
Wed., Jan. 29, Feb. 5, 12, 19 • 6 - 7: PM EST
(4) weeks
Mon., Jan. 27 - Mar. 2 • 6 - 7 PM EST
(6) weeks
Designing with Intention Thur., Feb. 6 - April 9 • 1 - 2:30 PM EST 10 weeks
Thur., Feb. 20 - Mar. 26 • 6 - 7 PM EST
(6) weeks
Wed., Mar 26 - April 1 (skip April 8) April 15 - May 6 • 6:00 pm - 7:30 pm EST
10 weeks

