

How to Take Better Jewelry Photographs on an iPhone or Cell Phone by Holly Gage
- Holly Gage
- Sep 4, 2020
- 10 min read
Updated: Oct 2, 2020

With COVID as the backdrop of our lives, I realize connecting is more important than ever, so here and there I host a free online session as a way to connect with our creative side and each other. The most recent session was called, "How to Take Better Jewelry Photographs on an iPhone or Cell Phone", and it was a full house! From the session, I put together these cliff notes, and in true Hollyesk style, it turned into the full-blown article featured below, and also available as a Free download on my Tutorials page!

Your Second Chance to Attend a Free Live Online Photography Tips Session is September 16, 2020 • 5:00 PM EDT (See below for details - limited seating)
I love sharing my student’s beautiful jewelry, so after each class, I always ask them to send me a beauty shot for that book I may finally write or to share on social media. My interest is spreading joy and beauty, and also for them to experience the grand public reaction to validate their efforts. Many of my jewelry students don’t have a professional camera and take photos with their cell or mobile phone. With images being shown on the Internet, over e-mail with clients, and on your website good pictures are a must!! So here are the basics to taking better pictures with your iPhone and inexpensive equipment. Many other brand cell phones have similar functions, so look in your photo editing software, and browse the choices. I using an iPhone SE, 13.7 software.
Lighting and Basic Photo Set-Up

Use a lightbox with no lights on the inside of the box or make your own with PVC pipe and parchment paper.
Natural-looking diffused lighting is best, and to achieve that I use GE Reveal Light Bulbs, they have a blue tint, but the lighting looks natural and the color is true to the object.
Subtle changes in the lighting or the position of the jewelry in the tent may be needed to achieve the best lighting effects.
Outdoor photography with natural lighting should be in an evenly shaded area or on a cloudy day to diffuse the light. No shadows should be on the jewelry.
Avoid hot spots or glaring light in the photo to obstruct your view of details.
Avoid reflections on the jewelry of objects, your tent, or your cell phone by changing the angle of the jewelry or the positioning of the camera.
Framing Up the Jewelry for an Appealing Composition
Have a clean uncluttered background, this is great for submitting to magazines and juried shows.
Grays are easier for cell phones to “read” versus more stark black. White seems to be trending. (It’s not my personal preference for silver jewelry.)
Avoid awkward lines or obstructive items that interrupt the eye flow of the jewelry.
Avoid photographing on highly textured backgrounds such as rice, beans, or gravel as the jewelry can get lost in all the texture making it difficult to separate the background and the details of the jewelry.
Consider staging your jewelry taking out all kinks in the beading or chain, and creating a nice flowing movement to the focal. Also, try placing the piece at different angles.
Crop in close enough to see the jewelry well.
Consider composition of the photo in an artful manner by framing the negative space around the jewelry as much as the jewelry itself allowing the spaces around the jewelry to have interesting shapes.
Avoid photographing the jewelry too low on the horizon, the steep angle makes it hard to see the jewelry.
Taking a Clear Picture
Tap your screen and hold your finger there to get a yellow outlined focus box, when box shudders 2x the picture focus is locked and you are less likely to see photo shake in the final result.
Make sure the full area to be in focus is in the box.
If you want the centerpiece and the chain in focus pull back the camera to have most of it in the yellow focus box. If you want the focal piece in focus only, but the chain blurred a bit make sure the yellow box is centered on the focal piece.
Hold the camera at the sweet spot —probably 4” or so from the jewelry with an iPhone, too close, and the camera can’t focus.
Don’t zoom in by enlarging the view on your screen, it degrades the picture. Instead, move the camera in closer or crop the photo when editing.
How to Edit Photos on the iPhone
Phones have come along way with a slew of editing options available right at your fingertips.
Open The iPhone Photo Editor In The Photos App (the rainbow flower)
Tap “Edit”
You will see 3 buttons at the bottom:
Adjust Dial
Photo Filters
Crop tool
Crop Tool
I always crop the picture in first, so you can see everything up close, and then it is easier to adjust color corrections, brightness, and use the other great tools.
Tap the Crop Tool (3rd button on the bottom)
New screen shows:
Top 2 buttons allow: Rotating and Flipping the photo.
Bottom 3 buttons allow: Straighten & Adjust Perspective. This allows you to reposition the angle of the photo or correct if you took the picture on a strange angle or skewed perspective
Adjust Dial

Even if you are unfamiliar with photo editing, by just moving the adjustments you can see right in front of you how each adjustment changes the picture. By holding up your jewelry you can make the adjustments you need to match what you see.
Tap the Adjust Dial (the first button), this gives you 16 tools to adjust color, brightness & sharpness.
Tap on each tool to use it and slide the ruler below it to adjust each setting.
Auto adjust (wand icon) lets the camera automatically fix the picture the way it thinks it should (not always reliable.)
Exposure (+/- icon) allows you to adjust the lighting of the photograph lighter or darker.
Brilliance (yin/yang icon) bringing out details and vibrance of the photo.
Highlights (circle half white/half-shaded icon) make the highlights brighter or darker.
Shadows (circle half dark/half-shaded icon) makes the shadows paler or darker.
Contrast (circle half dark/half white icon) changes both the darks and lights at the same time either darker or lighter.
Brightness (sunburst icon) brightens or darkens your photo. But it does it in a slightly different way and often better than the Exposure tool, states iPhone Photography School. B
Black Point (white circle with a little dot icon) Lightens and darkens your blackest black.
Saturation (smooth rainbow icon) increases or decreases the intensity of all colors. Complete desaturation can turn it to black and white photo
Vibrants (lined rainbow icon) increases the intensity of muted colors more so than already saturated colors while also working to protect skin tones.
Warmth (thermometer icon) adjusts the photo to make it cooler or warmer by altering the oranges and blues
Tint (water drop icon) adjusts the photo’s greens and magentas.
Sharpness (white triangle) sharpens the edges crisper, but overdoing this function with degrade the quality of the photo and possibly pixelate it.
Definition (split triangle icon) brings clarity to the details.
Noise Reduction (circle half dark/shadow) is like a blur tool making a grainy picture look more smooth
Vignette (circle with dots icon) adds a white or dark shadow around the picture for effect.
Photo Filters (bottom middle button)
This is not a function for accurate photos, but it is used to adjust the color tone and special effects. It’s fun to play with, but beyond the scope of this discussion about taking beautiful accurate shots of your jewelry.
Original is your original photo.
Vivid adds more contrast to the photo.
Vivid Warm makes the photo warmer adding yellow/orange.
Vivid Cool adds cooler blues to the photo.
Dramatic Warm adds deeper yellow/orange hues.
Dramatic Cool adds deeper blues hues.
Mono creates a black and white picture
Silvertone makes the picture black and white in addition it increases the shadows.
Noir - makes the picture black and white and increases the contrast.
Let’s Look at Samples of Good and Poor Photography
Here are some common mistakes made when an artist or hobbyist is displaying their jewelry photographs for public viewing. My motto is to always put your best foot forward, and many of these problems are easy to fix, so those solutions are provided to assist you in taking better pictures.

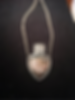
A. Good Photo. This necklace is well lit with diffused light and accurate color. The focus is on the centerpiece with the chain purposely blurred a bit as it trails back in the picture. The positioning of the chain creates overall movement in the photo and cropped in such a way, the negative space, the space around the jewelry, is interesting. The framing and the angle of the jewelry create an artful picture as well as a pleasing representation of the jewelry. The background does not distract from the jewelry.

B. Good Photo: These Earrings are very detailed and you can clearly see those details. They are hung so you can see how the finding attachment works and positioned in an interesting staggered fashion. Even though there is a mirror finish you do not see objects or camera reflected in the picture. The background is a neutral piece of slate and is not distracting.

C. Good Photo: This pin is in full focus showing every bit of detail.
The diffused light defines a brushed finish. It is cropped close to have interesting space around the object and positioned to show subtle movement.
D. Poor Photo. The jewelry is poorly framed on a dirty background. In addition, there is a hot spot of glaring light on the left corner of the stone as well as the texture at the top hiding the details of both. More attention needs to be giving to the positioning of the jewelry in the space, and the lighting should be diffused to prevent the glare.

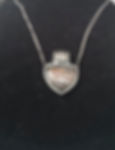
E. Poor Photo. The photo is overexposed which washes out the color of the jewelry. The jewelry is way too small to see the details and it is floating in the photo. Adjust the lighting as it is too strong, or use the exposer function to add deeper tons. Stage the jewelry, and move the camera closer to the subject.

F Poor Photo. The color of the metal is hard to read as silver because it is too yellow. Use the Warmth setting by adding more blue to balance the color. The framing of the piece is a bit better, but there could still be a better division of negative background space.

G. Poor Photo. This is a poor representation of your work, very informal and it doesn’t say the jewelry has much value. The lines in the background are distracting, the lighting and detail are poor.

H Poor Photo: The background texture competes with the jewelry and makes it difficult to see, especially the chain. There is also the shadow and silhouette of the photographer and cell whereas you should have no reflections, shadows, or objects appearing on the jewelry surface or in the photo.
I. Poor Photo: The angle of the photo makes the details in the jewelry hard to see. Raise your cell phone up off the horizon at a higher angle. Again, the background is dirty and distracting and the position of the jewelry is boring.

J. Poor Photo: The jewelry is poorly framed, and the positioning of the jewelry is boring. Stage the jewelry and crop in closer on the picture.

K. Fair Photo: The jewelry is showing some interesting movement with the layout of the chain and jewelry angle, but to be more interesting, crop in closer which would make the negative space around the jewelry more interesting and the jewelry bigger.

L. Fair Photo. The colors match the jewelry. and the cropping of the photo creates interesting positive and negative spaces, but the top part of the centerpiece is not in focus, so it is hard to see the texture.
Quick Tip on Marketing and Labeling your Photos
Title your Photos
Rename your photos for the web so they can be found in a search engine. Pictures are not searchable unless they have a name. Most are labeled with a generic number such as DCN12385. You will want to give it a name with keywords such as “Silver Elephant by Margret Mouse.” I couldn’t find a way to do that on my iPhone, but if you download your photo to your computer where you can rename them or most web programs give you an option to rename the file within the interface.
Size Your Photos for the Proper Usage, Print or the Internet
There is such thing as resolution giving your photos more or less pixels and data making your photo quality better or worst, and the file size bigger or smaller. For print, you need high resolution, for the Internet you need screen resolution which is a smaller file. As a rule, I take all pictures in high resolution because I never know where I will be using them either in print or the Internet. One time in particular you will need to change your photo size to a smaller file size is if using the photos on your website. Large files take a longer time to load on the computer screen making your site run slowly, whereas smaller file sizes help it to load quickly.

Looking for other Jewelry Marketing Tips
See my blog post
"Why Are You Pricing
Your Jewelry So LOW??? "
References Mentioned in the Online Session:
Pinterest Page https://pin.it/7nAvs6q Contains links to:
• Brooder work lights
• GE Natural Reveal 40W light bulbs
• Photo tent• Photographing jewelry tips
• Photo editing software
If you try any tips in this article, please tag me on social media so I can see your awesome new photos.
To be the first to know about Holly Gage News, Blogs, Classes, or Free Sessions go to
the form at the bottom of the page to sign up.


Live Online Metal Clay Jewelry Classes
The Art of Designing a Signature Jewelry Line - 2 Spots Left
Repousse Effects in Metal Clay - Now Full
Bezel Setting Like A Pro - 3 Spots Left
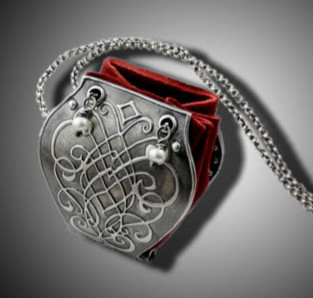
Jorvik Viking Purse 1 Spots Left
Romancing the Stone - 2 Spots Left
Innovative Prong Solutions in Metal Clay 2 Spots Left
Thursday, November 12, 19, (skip Nov. 25) Dec 3, 10, 17, (skip Dec. 24, 31) Jan. 7 • 6 - 7:00 PM EST
6 -week group sessions • 60 min. Live & Interactive on Go to Meeting _____________________________________________ Carving and Sculpting in Metal Clay
Thursdays, October 15 - November 19, 2020 • 11:00 am - 12:00 PM EST
6-week group sessions • 60 min. Live & Interactive on Go to Meeting _____________________________________________ Bezel Setting Like A Pro - NEW
Tuesday, October 20 - November 10 • 1:00 PM - 2:00 PM EDT
4-week group sessions • 60 min. Live & Interactive on Go to Meeting

To register contact: Holly at hgage1@ptd.net
Opal Auctions
Chris has been in the studio "rocking" the tunes to the classic oldies and cutting opals. Stop by this week for his Friday auction 15 Opal 10 AM - 10 PM EST on Christopher Gage's Facebook Page

Are You Looking for a Place to Share Everything Metal Clay? How about get inspired, share ideas, show your latest jewelry, obtain tips, get advice, ask questions, or find solutions? Metal Clay and Mixed Media is an active Facebook group I moderate and invite you to join in with the connectivity and comradery.